Introduction
Before we get into the technical issues that will be covered throughout this post, I would like to introduce myself to you, dear reader. My name is Lucas de Araújo, and I’m a junior security analyst in Tempest’s Consulting sector, which specializes in carrying out projects involving offensive security.
Taking advantage of the possibility of conducting a research project during my internship, I chose to analyze, from a cybersecurity perspective, the problems of a technology used daily by so many people: radio frequency identification.
Radio Frequency Identification: Getting Started
Radio frequency (RF) is a technology that is widely used in various areas and its main benefit is that it facilitates remote communication, allowing people to connect and share information efficiently. It works by transmitting electromagnetic waves (waves that carry several types of data) through space, at frequencies ranging from hertz to giga-hertz.
In order for people to communicate in a system that uses radio frequencies, they need to be identified within the system, which means that it’s necessary to use a technology that allows this identification, a technology known as RFID.
RFID technology makes it possible to identify a subject by means of a system of electronic labels (tags) containing information that will be transmitted via radio frequency in order to carry out operations in the system.
These electronic tags are usually seen in the form of cards or key rings and have an internal structure similar to this one:
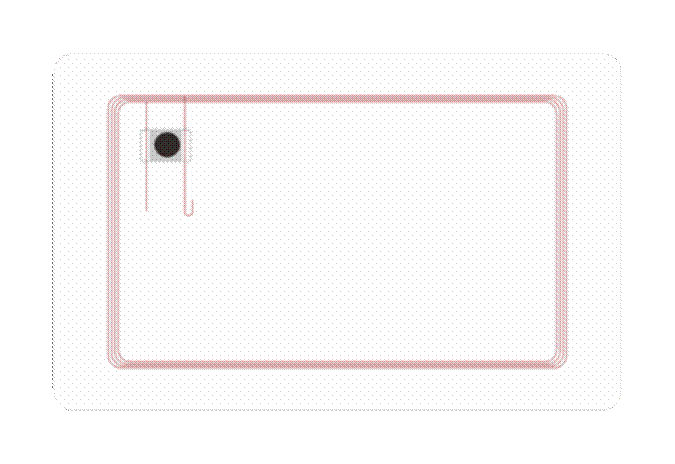
Every electronic tag has three main components: an antenna, a chip (or integrated circuit) and a support structure.
- Antenna: Responsible for receiving the radio waves emitted by the reader and converting the energy from these waves into electrical energy. The energy is then used to power the chip
- Chip: Responsible for storing the information that will be transmitted to the reader. It also controls communication and encrypts and decrypts the information transmitted between the card and the reader.
- Structure: Its function is to protect the antenna and the chip, which in this case would be the card’s shell, in order to prevent damage to the components.
MIFARE Classic cards
Having explained a little about the radio frequency, the identification system involving it and the mechanisms used for this, I will now introduce the protagonist of this post, the MIFARE Classic RFID cards.
Launched in 1994 by NXP Semiconductors (formerly Philips Semiconductors), MIFARE Classic cards quickly gained ground in the market due to their low cost, allowing them to be massively implemented in access control systems with many agents, such as ticketing systems.
MIFARE Classic has two models that differ in their storage capacity, one with a 1K capacity and the other with a 4K capacity. Both have an internal structure divided into sectors and blocks, with each sector having a set of data blocks and the two keys A and B that govern access control to this block.
The MIFARE Classic cards use a proprietary cryptography, called Crypto-1, developed by NXP itself during the design of the card. For a long time, the company used the principle of security by obscurity to ensure that no malicious individual could subvert the mechanisms of this cipher, but, as you’ll see below, since 2008 researchers have been reporting vulnerabilities involving this cryptography.
From now on, in this post, I’ll be working with the 1K version, since it was the one on which I did my research, but all the facts observed, including the vulnerabilities described later, apply equally to the 4K version.
The engineering behind the card
To make it easier to visualize what will be described in this section, here is an image illustrating the logical structure of the MIFARE Classic (1K) cards):
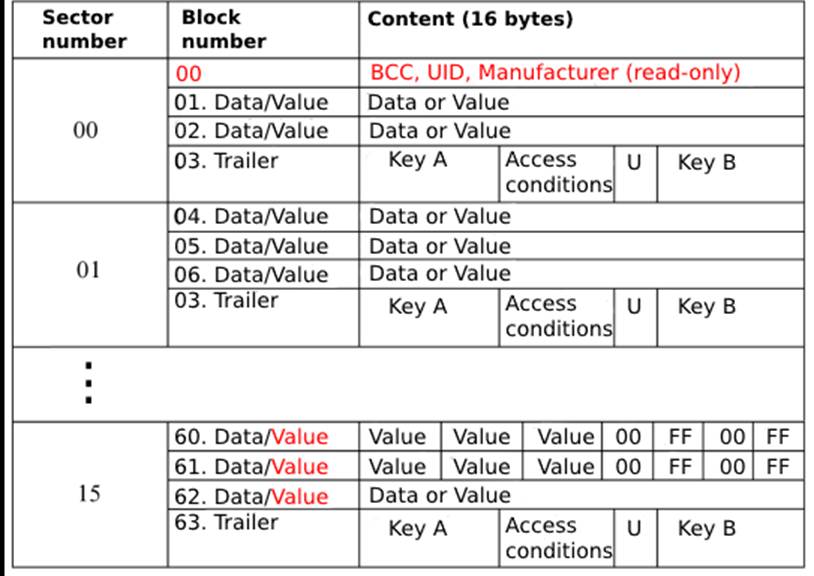
As you can see, the sectors follow a standard structure, with the exception of block 0 in sector 0. So let’s start with that.
Manufacturer Block
This block is responsible for storing the card’s unique identification (UID), as if it were a “stamp” assigned to each card that leaves the factory. In this case, this stamp is a set of 4 bytes, such as: 4A 5B 2C 9D
Next to this set of bytes is the BCC, a byte responsible for checking the integrity of the UID to ensure that it hasn’t been altered in any way. The checking process is conducted using XOR (the infamous “exclusive or else”) operations.
After the BCC, the rest of the data in this block refers to the manufacturer. This data is information such as: card model, manufacturer name, etc.
An important feature of this block is that it is read-only, i.e. during communication with the reader, the reader isn’t allowed to write to it and change its data.
However, there are “magic” cards (not ironically nicknamed Chinese Magic Cards) that have the exact same structure as a MIFARE Classic card, but with write permission available in this block, thus allowing its UID to be changed. Later on, I’ll mention the subversion possibilities that these magic cards can provide.
Datas Block
The data block is responsible for storing user information, information related to access control and any other information that is relevant to the context in which it is being used. In a public transport ticketing system, this is where information such as the person’s name and the amount of balance available on the card would be stored.
Trailer block
Finally, located at the end of each sector, the card’s trailer block is responsible for storing the A (mandatory) and B (optional) keys that manage control access to the information present in the respective sector in which they are located.
Key A will always be mandatory and is commonly used to read and authenticate the sector, while key B can be optional and is normally used to perform operations on the information in the sector’s data block (reading, writing and deleting). However, there is no constraint during the design of the card for the roles of these respective keys to be different from the above.
When key B isn’t present in the sector, it will usually be replaced by other data that can be used by the card.
Communication
Now I’ll talk about how the communication process works between an RFID reader and the card as soon as they are brought together so that you can understand exactly how the exchange of information between one and the other takes place.
The communication process can be broken down as follows:
- Field Activation: When the card is present in a certain radius in which the reader can detect it, it will send a request of type A or B
- Card response: As soon as the card receives this request, it will respond to the reader to tell it what type of card it is, allowing the reader to know how to proceed with the communication.
- Anti-Collision: After receiving the card’s response, the reader sends a few more requests to detect if there are any other cards nearby, avoiding interference in communication with the desired card. If only one card responds to the signals, the reader selects that card and continues communication.
- Authentication: Before exchanging information with the card, the reader must authenticate itself using the appropriate key (A or B) for the operation to be performed. The reader and the card then perform a challenge-response handshake process using the Crypto-1 cipher. This step ensures that the reader has the appropriate key it claims to have and can therefore access the information on the card.
- Data exchange: After successful authentication, the reader and the card will exchange information encrypted by the keys and the operations desired by the reader will be carried out.
- Finalization: Once the reader has finished carrying out the desired process, it will send a command called Halt so that the card is put into a “sleep” state and no longer responds to the reader’s commands until it is approached again and the whole process is repeated.
The following image illustrates the process:

Crypto-1: Introduction
Developed by NXP during the design of the MIFARE Classic card, Crypto-1 was a proprietary algorithm that aimed to guarantee the security of the communication between card and reader during the transmission of information. The algorithm was kept a secret from the industry for many years, a technique known as “security by obscurity” to ensure that no one, in theory, would be able to discover the vulnerabilities present in it.
However, in 2007, two researchers (Nohl and Plotz) reverse-engineered part of the algorithm using an electronic microscope and were able to reconstruct the cipher. The following year, two other researchers (Gans and Garcia) also recovered the algorithm by observing the communication between the reader and the card, which led to the creation of the software called Crapto-1, which aims to demonstrate the vulnerabilities in the original implementation of Crypto-1.
The Crypto-1 algorithm is essentially a stream cipher. Its main part is the pseudo-random bit generator that produces the keystream bits that will be used to encrypt and decrypt messages. This generator consists of a 48-bit LFSR that follows the structure of the following polynomial
x⁴⁸ + x⁴³ + x³⁹ + x³⁸ + x³⁶ + x³⁴ + x³³ + x³¹ + x²⁹ + x²⁴ + x²³ + x²¹ + x¹⁹ + x¹³ + x⁹ + x⁷ + x⁶ + x⁵ + 1
The following image illustrates the LSFR diagram and Crypto-1’s auxiliary functions:

CCrypto-1 – Generating the Keystream
Known as the Keystream, this is the sequence of bits that will be used to encrypt the information. The keystream has a fixed size and each bit in its sequence is generated after a number of clocks (operations) from the generator (in this case, the LFSR and its auxiliary functions).
In this Crypto-1 scenario, the following sequence of instructions is followed::
- Every clock cycle, the non-linear generator filter receives 20 new bits from the LFSR and produces an exact Keystream bit.
- The LFSR then shifts one bit to the left and inserts a new bit on the right. This inserted bit will be processed using the following equation:

- The generator filter that produces the resulting Keystream bit is defined by combining three logical functions, illustrated below:

Crypto-1: Pseudo-Random Number Generator (PRNG)
This generator is responsible for creating the challenges (nonces) used during the authentication process between card and reader.
A second LFSR is used, this time a 32-bit one, which always starts with the same sequence of bits every time the card is energized (10101010101010101010101010101010).
Due to the small number of bits, the fact that each shift of the LFSR has an exact time in seconds and the fact that the initial state of the generator is always the same, it’s possible to estimate the value of a future challenge. This thinking will allow the exploitation of some attacks that will be demonstrated later. This means that Crypto-1’s pseudo-random number generator is not cryptographically secure.
The formula used by the LFSR of this generator is illustrated in the following image:

Note: despite having a 32-bit initial state, the generator only works with 16 bits. This fact also made it easier to exploit the vulnerabilities present in it.
Attacks: Introduction
From this point on, I’ll begin to explain and detail the methodology used in the most common attacks involving MIFARE Classic cards, but first, a few observations:
- The attacks described here are aimed exclusively at the MIFARE Classic card and are attacks in which the attacker manipulates the card in isolation, without the need to monitor communication between an authentic reader and the card.
- The attacks will be separated into two categories: Attacks using Arduino UNO along with the RC522 module and Attacks using the Proxmark3 device in the RDV2 version.
- During the study process, cards typically used in commercial applications, such as consumption control in restaurants and building access control, were used as “victims”.
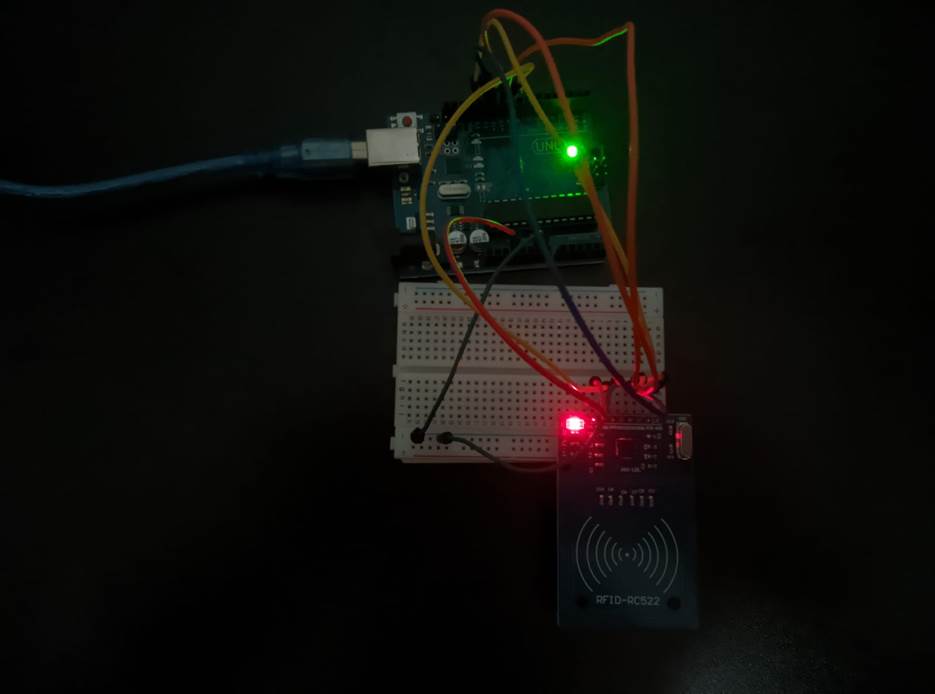
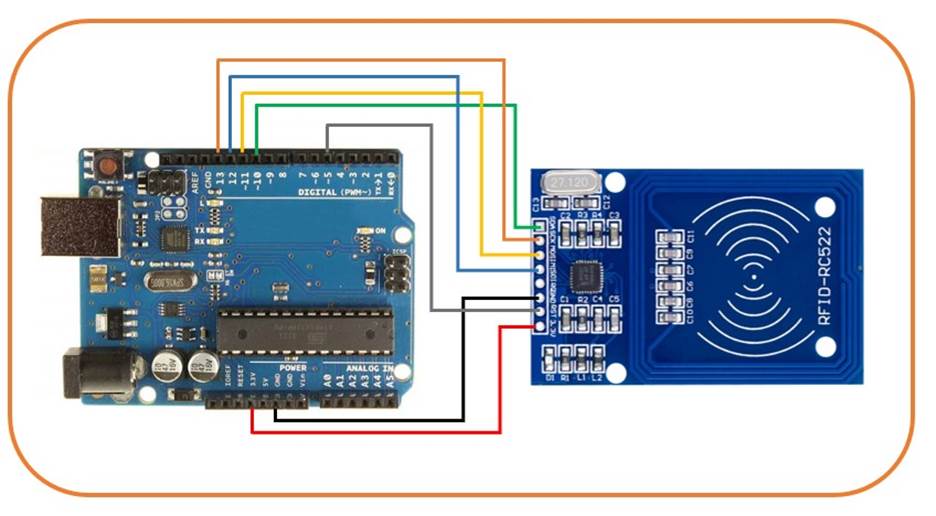
Ataques: Arduino – RC522
For this category of attacks, the RFID library by the author miguelbalboa was used, which was designed to operate on the RC522 module. It was possible to carry out two types of attack in this category:
- Cloning the victim card’s UID.
- Decrypting the victim card and cloning the rest of its information.
The following images illustrate the final configuration of the Arduino and a schematic of the prototype:
UID clone
As mentioned earlier in the card engineering section, each MIFARE Classic card has a UID that allows it to be identified.
To prevent this UID from being altered, the manufacturers of this card do not allow writing operations in the memory sector where it resides, but there are other manufacturers who sell MIFARE Classic cards with this passive memory sector. As previously stated, these cards are colloquially known as “Chinese Magic Cards”.
Many systems only use the UID to check whether or not a particular card is authorized to access a certain system, building, sector, etc. The problem with this is mainly due to the fact that the UID does not represent encrypted information inside the card. Therefore, it’s possible to obtain the card’s UID through proximity reading, for example using cell phones with NFC technology.
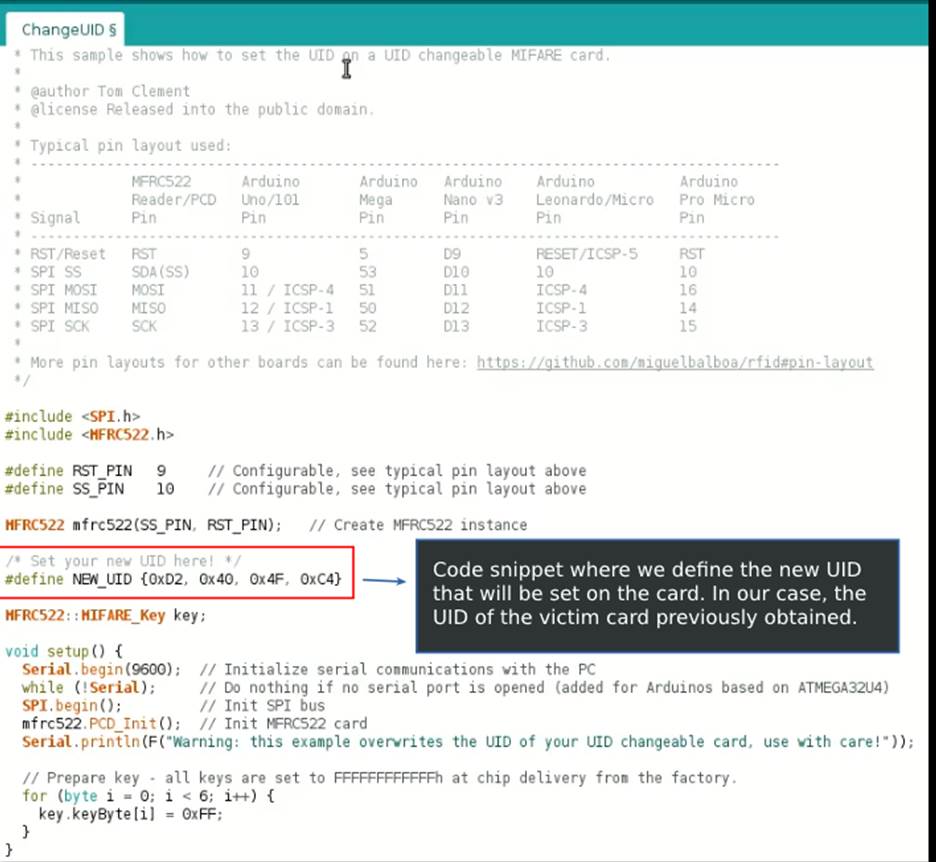
To clone the UID from a victim card to the attacker’s card, we can use the code available in the RFID library, which manages the entire interaction process with the RC522 module connected to our Arduino. The following image illustrates an excerpt from the code that will be executed to replace the UID of the attacker’s card with the UID of the victim’s card.
After successfully cloning the UID, an attacker would be able to exploit systems that rely exclusively on verifying the user’s identity by the UID on the card. Our experience at Tempest shows that this type of attack scenario is quite common (and effective) in access control systems, such as in corporate buildings and restricted areas in factories, industries and private offices.
Attacks: Proxmark 3 RDV2
Originally built by Jonathan Westhues in 2007, Proxmark 3 is a versatile tool for conducting research and analysis on RFID devices. It was designed to be able to read, write and emulate RFID cards.
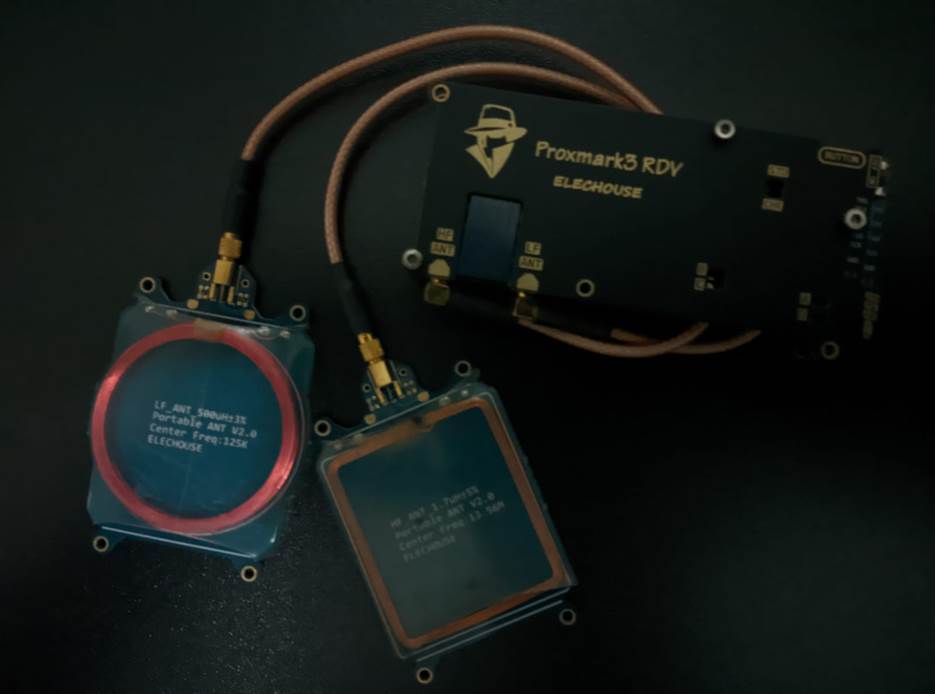
The code for Proxmark 3 is open source and can be found in this repository. The following image shows Proxmark 3 in its RDV2 version, which was the version used for testing during this research:
Before tackling the attacks in this section, it’s important to understand why we’re discussing them. Unlike the Arduino example, certain systems can use features on the card itself to ensure complete user authentication. Often, these systems store sensitive data in the card’s memory, which will be used by the user after authentication to the system. For example, in public transport e-tickets, the user’s balance is stored in the card’s memory and checked before authorizing or denying the access to the vehicle.
However, in order to gain access to the information contained on the card, it’s necessary to discover the keys present in each sector in order to decrypt, modify and write the data. Due to the limitations of Arduino, carrying out this whole process can be quite costly and inefficient, since the Arduino hardware was not designed specifically for this purpose. This is where Proxmark 3 emerges to meet this need effectively.
With this in mind, I’ll explain how three attacks (Nested, Darkside and Hardnested) work to obtain the keys present in the card sectors and the reasoning behind them.
Proxmark 3: Nested attack
This type of attack is used in a scenario where the attacker has at least one key from a sector of the card. This attack makes use of the nonce mechanism described above, in which the nonce is always generated from the same sequence and each subsequent iteration has a certain average time.
We can summarize this attack in the following steps:
- The attacker initiates an authentication (in the sector where he knows the key) and, because of this, the card generates a first nonce.
- The attacker performs another authentication in another sector in sequence which he doesn’t have the key for.
- The card then responds to this new authentication with a new encrypted nonce and, by calculating the “distance” between the two nonces by monitoring the time between the two consecutive authentications, the attacker is able to predict which decrypted nonce was generated in the second authentication.
- Having the decrypted and encrypted nonce in hand, the attacker is then able to perform an “XOR” operation and recover 32 bits of the keystream that was used to encrypt the nonce.
- After this process, the attacker now has a much smaller domain space in his hands and can use brute force attacks to discover the remaining bits of the keystream and conclude the respective key of the sector being attacked.
- Finally, to discover the remaining keys of the other sectors, simply repeat the process with the keys obtained previously.
This process can be combined with other analyses aimed at reducing the number of possibilities in the keystream, so that the attacker can get closer and closer to the respective sector key.
The following image illustrates this attack being executed with Proxmark3 RDV2 on a victim card:

Proxmark 3: Darkside attack
But what if we don’t have a card key? What should we do? Well, in this scenario, we’ll have to use another type of attack, commonly known as Darkside.
The Darkside attack was first described in the article entitled “The Dark Side of Security by Obscurity: And Cloning MiFare Classic Rail and Building Passes, Anywhere, Anytime” by Nicolas T. Courtois. In this article, the author explores several aspects related to the authentication process and discusses topics associated with security based on obscurity.
The Darkside attack aims to take advantage of the NACK (Negative Acknowledgment) response code, which is generated when the parity bits sent to the card are correct, even if the key selected is not the correct one. In this situation, the card responds with a NACK code (4 bits) encrypted with the keystream. Since the NACK code is small, a brute force attack can be performed quickly in order to discover the NACK code before it’s encrypted. After this, it’s possible to perform an XOR operation between the decrypted code and the encrypted one, making it possible to obtain part of the keystream used.
In simplified terms, we can summarize this attack as follows:
- First Contact: The attacker positions the Proxmark 3 next to the card. After this, the attack process begins.
- Auxiliary Cryptogram: The attacker then begins to send a cryptogram generated by his device that has the correct parity bits so that, when the card performs the check, the NACK code is issued.
- NACK code: Due to the correct parity bits, the card will respond with the NACK code (4 bits) encrypted with the keystream.
- Brute force: The attacker must now use brute force to find out which are the respective 4 bits of plaintext in the NACK. As 4 bits allow only 2⁴ possibilities, the plaintext code can be obtained quickly.
- Keystream bits: Once the plaintext code has been discovered, the attacker performs the XOR process with the encrypted code and will have 4 keystream bits in hand.
- Repetition: Now, along with the other prediction analyses, the attacker just has to repeat the process until they get as close as possible to the attacked sector’s key.
Once a key has been found, the attacker simply uses it to carry out the Nested attack described above, in order to obtain the corresponding keys for the other sectors.
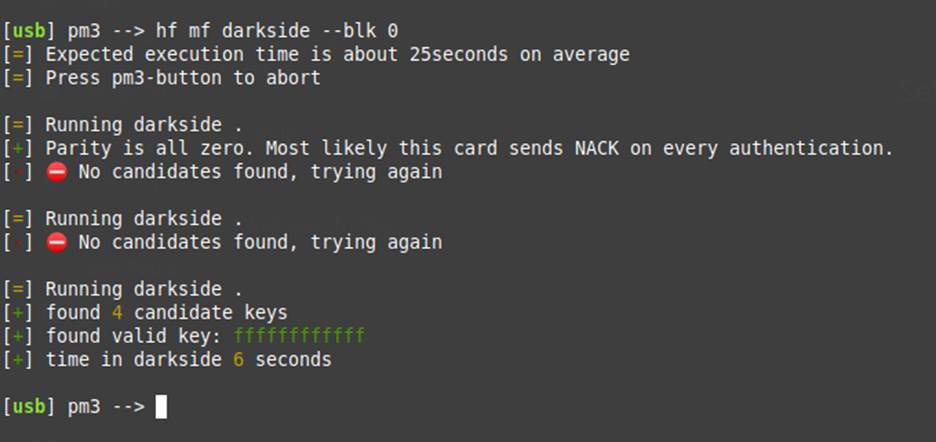
The following image illustrates this attack being carried out with Proxmark3 RDV2 on a victim card:
Proxmark 3: Hardnested attack
After the repercussions of the two types of attack mentioned, especially the Nested attack, the manufacturer of MIFARE cards (NXP) realized that they had to mitigate what was happening to their product in some way.
The solution adopted at the time was to apply changes to the pseudo-random number generation algorithm responsible for generating the nonces that are used during the authentication process. The main purpose of the change was to make it as difficult as possible for the process of predicting the value of the nonce in plain text, a key element in the Nested attack, to be executed.
However, in 2015, it was demonstrated in the article entitled “Ciphertext-only Cryptanalysis on Hardened Mifare Classic Cards” by Carlo Meijer and Roel Verdult that by collecting several encrypted nonce values, combined with some cryptographic analysis techniques, it’s possible to obtain the key of an arbitrary sector in a timely manner.
This process is considerably more complex than the attacks mentioned above, making it difficult to describe in detail in this text. However, I’ll provide a brief overview of the steps involved in this type of attack:
- The attacker collects between 2000 and 4000 nonces generated by the card through consecutive authentication attempts.
- A series of bit-by-bit analyses is carried out on the nature of these nonces so that the scope of the original key (2⁴⁸) is reduced as much as possible.
- Once the scope has been reduced, a brute force attack is conducted to obtain the original key.
I should point out that this attack was the only one in which it was not possible to obtain enough information to actually execute it. During the research process, I was unable to obtain a card that had the new PRNG mechanism mentioned. Therefore, my understanding is based solely on case studies and experiences reported by other researchers and enthusiasts in the field.
Conclusions
Having presented the engineering of the MIFARE Classic cards and their most famous attacks, the question that remains is: what can we do to protect ourselves?
At the moment, MIFARE Classic cards are still very popular due to their low cost, but the manufacturer itself recommends using one of its newer card models, such as MIFARE Desfire, which uses AES encryption instead of Crypto-1.
Although there is no definitive solution to prevent attacks on MIFARE Classic cards, it is possible to adopt some measures that make it more difficult for attackers to succeed:
- Configure all sectors so that each of their respective keys doesn’t remain at the factory default value;
- Avoid leaving sensitive information on the card and, if possible, conduct a second validation via another communication channel;
- If a reader is replaced or dumped, make sure to delete the keys in its memory to prevent attackers from capturing and performing reverse engineering in search for the keys;
- Monitor points where readers are installed and watch for signs of attackers intercepting communication between victims’ cards and the reader. This type of attack can be carried out using Proxmark 3;
- Finally, if you use a card of this type, it’s advisable to get special wallets (popularly known as anti-theft wallets) that inhibit the reading of radio frequency cards when they are near a reader. This blocking of communication between the card and the reader is possible thanks to a physical concept known as a Faraday Cage.
References
- CHANTZIS, F.; STAIS, I.; CALDERON, P.; DEIRMENTZOGLOU, E.; WOODS, B. Practical IoT Hacking: The Definitive Guide to Attacking the Internet of Things. 1. ed. [S.l.]: No Starch Press, 2021.
- COURTOIS, Nicolas. The Dark Side of Security by Obscurity – and Cloning MiFare Classic Rail and Building Passes, Anywhere, Anytime. In: SECRYPT 2009, PROCEEDINGS OF THE INTERNATIONAL CONFERENCE ON SECURITY AND CRYPTOGRAPHY, Milan, Italy, July 7-10, 2009. [S.l.]: ResearchGate, 2009. Available at: https://www.researchgate.net/publication/221436521_The_Dark_Side_of_Security_by_Obscurity_-_and_Cloning_MiFare_Classic_Rail_and_Building_Passes_Anywhere_Anytime. Accessed on: June 29, 2023.
- FINKENZELLER, Klaus; MÜLLER, Dörte (Tradutor). RFID Handbook: Fundamentals and Applications in Contactless Smart Cards, Radio Frequency Identification and Near-Field Communication. 3rd Ed. [S.l.]: Wiley, 2011.
- MEIJER, Carlo; VERDULT, Roel. Ciphertext-only Cryptanalysis on Hardened Mifare Classic Cards. 2015. Available at: http://cs.ru.nl/~rverdult/Ciphertext-only_Cryptanalysis_on_Hardened_Mifare_Classic_Cards-CCS_2015.pdf. Accessed on: June 29, 2023.
- OLIVEIRA, L. de S.; SOUSA, J. P. C. de; MACIEL, O. A. P. da S. Revisiting RFID Mifare Classic security in the context of investigations that account millionaire losses a case study based on the ticketing system implemented in Brazil/ Revisitando a segurança do RFID Mifare Classic no contexto de investigações que contabilizam perdas milionárias um estudo de caso baseado no sistema de bilhética implementado no Brasil. Brazilian Journal of Development, [S. l.], v. 8, n. 3, p. 20117–20133, 2022. DOI: 10.34117/bjdv8n3-287. Available at: https://ojs.brazilianjournals.com.br/ojs/index.php/BRJD/article/view/45438. Accessed on: June 29, 2023.
- PATERIYA, R.K.; SHARMA, Sangeeta. The Evolution of RFID Security and Privacy: A Research Survey. In: 2011 INTERNATIONAL CONFERENCE ON COMMUNICATION SYSTEMS AND NETWORK TECHNOLOGIES. [S.l.]: IEEE, 2011. Available at: https://ieeexplore.ieee.org/document/5966417?arnumber=5966417. Accessed on: June 29, 2023.
- SOUZA, W. B. Cartão MIFARE classic ataques e medidas de contorno. 2011. Dissertação (Mestrado em Ciências) – Universidade de São Paulo, [S. l.], 2011. Available at: https://silo.tips/queue/cartao-mifare-classic-ataques-e-medidas-de-contorno-wellington-baltazar-de-souza. Acessed on: June 29, 2023.