Introduction
Currently, to create frontend applications using JavaScript, the frameworks Angular, React e Vue stand out for their maturity and popularity. In addition, there are many examples and use cases available for study, which allows developers to easily find examples to quickly create testable and extensible applications.
On the backend, the situation is a little different. The best-known name is Express, which defines itself as “a fast, opinion-free, minimalist web framework”. With it it’s possible to create an application quickly, with total freedom for the developer to choose its architecture: the way it’ll manage routes, middleware, template engines, body parsers, error handling, database, etc. Its minimalism allows for high flexibility, but this can become a problem for beginners; or even when working with teams, since the code is in danger of becoming unstructured.
NestJS solves this problem by staying on a layer above Express, with a well-defined and ready-to-use architecture. Including the use of already consolidated and tested libraries, reducing decisions for beginners, mitigating inconsistencies in the code and facilitating the understanding of those who are looking at the project for the first time, thus allowing to create testable applications, scalable, loosely coupled and easy to maintain, using filters, pipes, interceptors, among others.
The architecture, syntax and components are inspired by Angular. Despite being aimed at frontend applications, it has architectural concepts that can easily be used in backend solutions. NestJS also inherits several framework concepts that are widely used in the corporate environment, such as Spring Boot and .NET Core.
Among the advantages of using NestJS, we have some highlights:
- Well-structured architecture, easy to learn and master;
- Uses TypeScript;
- A very detailed Documentation;
- Uses Express as a standard HTTP server (you can replace it with Fastify or create an adapter);
- Monolithic applications as standard, but with a structure prepared for microservices (including support for gRPC, NATS and Kafka, among others);
- Built-in support for GraphQL and OpenAPI (Swagger);
- Authentication via Passport, rate limiting and other security features;
- Several ready-made “recipes”: Mongoose, Sequelize, generator CRUDs, Health checks, documentation generator, among others;
- Structure ready for Tests unit, end to end (e2e), integration etc. Integrated with Jest and SuperTest;
- Nest CLI to create applications, update dependencies and facilitate the daily routine;
- Open source.
Prerequisites
Before we start creating our sample API, to follow all the steps as described in this guide, you need to have installed:
- Node.js, version 10.13 or higher;
- Nest CLI (optional, but recommended);
- PostgreSQL, version 9 or higher (can be via Docker).
Creating our API
In this guide, we will show you the steps for creating a RESTful shopping list API, including service definitions via Swagger. Let’s start?
With Node.js (>= 10.13), the first step is to install Nest CLI and create our project, running in the terminal:
npm i -g @nestjs/cli
nest new nest-shopping-list
If you don’t want to install the CLI globally, you can run it via npx (present in npm>=5.2). In this guide, however, the examples will be demonstrated with the CLI installed:
npx @nestjs/cli new nest-shopping-list
In the sequence, you’ll have the list of files that were created and you’ll have to choose the package manager of your preference (npm or yarn). Throughout this guide, we’ll use npm as a reference.
$ nest new nest-shopping-list
⚡  We will scaffold your app in a few seconds…

CREATE nest-shopping-list/.eslintrc.js (631 bytes)
CREATE nest-shopping-list/.prettierrc (51 bytes)
CREATE nest-shopping-list/README.md (3339 bytes)
CREATE nest-shopping-list/nest-cli.json (64 bytes)
CREATE nest-shopping-list/package.json (1980 bytes)
CREATE nest-shopping-list/tsconfig.build.json (97 bytes)
CREATE nest-shopping-list/tsconfig.json (339 bytes)
CREATE nest-shopping-list/src/app.controller.spec.ts (617 bytes)
CREATE nest-shopping-list/src/app.controller.ts (274 bytes)
CREATE nest-shopping-list/src/app.module.ts (249 bytes)
CREATE nest-shopping-list/src/app.service.ts (142 bytes)
CREATE nest-shopping-list/src/main.ts (208 bytes)
CREATE nest-shopping-list/test/app.e2e-spec.ts (630 bytes)
CREATE nest-shopping-list/test/jest-e2e.json (183 bytes)

? Which package manager would you ❤️ to use? (Use arrow keys)
❯ npm
  yarn
Confirm your choice with [Enter], wait for the installation of the packages and you’ll see the confirmation of the creation of the project, including the instructions to start the application.
✔ Installation in progress... ☕

🚀  Successfully created project nest-shopping-list
👉  Get started with the following commands:

$ cd nest-shopping-list
$ npm run start
The nest-shopping-list folder was created with the basic structure of your new project. Navigate to it, and initialize to test:
cd nest-shopping-list
npm run start:dev
In a few moments, you should see something like this:
[NestFactory] Starting Nest application...
[InstanceLoader] AppModule dependencies initialized +15ms
[RoutesResolver] AppController {}: +5ms
[RouterExplorer] Mapped {, GET} route +3ms
[NestApplication] Nest application successfully started +3ms
With that, you can now test the server by opening http://localhost:3000 in your browser to check out the good old “Hello World!”.
As we started with npm run start:dev, the server was initiated with the –watch option, monitoring changed files and reloading the application automatically. Check out more details and options in the documentation.
Open the project in your favorite code editor, such as VSCode, and you will see this structure:
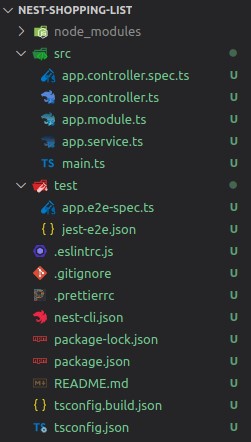
In main.ts we have the bootstrap() function that performs the initialization of our application and starts listening on port 3000.
import { NestFactory } from '@nestjs/core';

import { AppModule } from './app.module';
async function bootstrap() {
const app = await NestFactory.create(AppModule);
await app.listen(3000);
}
bootstrap();
You can open the src/app.service.ts file and update the return of the getHello() function to whatever you want, and save. By refreshing the browser page, you can check the updated API response.
After this initial test, finish the execution by pressing Ctrl/CMD + C on the terminal.
Now, we’re all set, and we can effectively start creating your API!
Creating the structure for the entity
For our shopping list, we’ll have the Item entity, with name, description (optional) and quantity of each item on the list.
We will use NestCLI’s CRUD to automatically create our entity, its module, REST controller, service and DTOs, as well as the test .spec files.
nest generate resource item
At this point, we must choose the transport layer for our resource: REST, GraphQL, microservice or websocket gateway. Choose the REST API and for the question “Would you like to generate CRUD entry points? (Y / n) ”, type Y and Enter.
$ nest generate resource item
? What transport layer do you use? REST API
? Would you like to generate CRUD entry points? Yes
CREATE src/item/item.controller.spec.ts (556 bytes)
CREATE src/item/item.controller.ts (883 bytes)
CREATE src/item/item.module.ts (240 bytes)
CREATE src/item/item.service.spec.ts (446 bytes)
CREATE src/item/item.service.ts (607 bytes)
CREATE src/item/dto/create-item.dto.ts (30 bytes)
CREATE src/item/dto/update-item.dto.ts (169 bytes)
CREATE src/item/entities/item.entity.ts (21 bytes)
UPDATE package.json (2013 bytes)
UPDATE src/app.module.ts (308 bytes)
Packages installed successfully.
Check the new src/item folder in your editor. There you’ll find the created files:
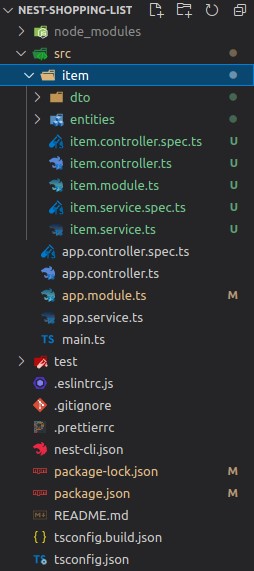
- module.ts: our module, which specifies the controllers and providers that are necessary for the functioning of this module, and will be available in its scope. Documentation;
- controller.ts: controller responsible for the REST service, with the methods memorized with @Post(), @Get(), @Patch() and @Delete(), all calling the itemService. Documentation;
- service.ts: provider responsible for the Item business rule and calls to data sources. This service can also be exposed so that other application modules can use it, in case they need to interact with Item. Documentation;
- entities/item.entity.ts: our Item entity, which for now is empty.
Adding persistence
Before starting to change the code, let’s install the TypeORM and PostgreSQL dependencies to manage our database. One of the interesting points of TypeORM is that it can keep our entity in sync with the structure in the database.
npm install --save @nestjs/typeorm typeorm pg
We’ll also add the dependency of ConfigModule, responsible for loading the declarations from the .env file in the environment variables and not maintaining the connection properties of the database and other sensitive information (or customized) directly in the code.
npm install --save @nestjs/config
Internally, @nestjs/config uses the popular library dotenv.
After the installation is complete, we will start by creating our .env file at the root of the project. Update the example if your PostgreSQL database settings are different.
SERVER_PORT=3000
MODE=DEV
DB_HOST=127.0.0.1
DB_PORT=5432
DB_USERNAME=postgres
DB_PASSWORD=
DB_DATABASE=shopping_list
DB_SYNCHRONIZE=true
Important
Don’t forget to add a line with .env to the .gitignore file, so that it doesn’t accidentally stay in the repository.
From this point on, the files referenced in the guide will always be based on the src/… path.
In our AppModule (app.module.ts), we’ll import the ConfigModule and TypeOrmModule, leaving the file as follows:
import { Module } from '@nestjs/common';
import { ConfigModule } from '@nestjs/config';
import { TypeOrmModule } from '@nestjs/typeorm';
import { AppController } from './app.controller';
import { AppService } from './app.service';
import { ItemModule } from './item/item.module';

@Module({
 imports: [
   ConfigModule.forRoot(),
   TypeOrmModule.forRoot({
     type: 'postgres',
     host: process.env.DB_HOST,
     port: parseInt(process.env.DB_PORT),
     username: process.env.DB_USERNAME,
     password: process.env.DB_PASSWORD,
     database: process.env.DB_DATABASE,
     entities: [__dirname + '/**/*.entity{.ts,.js}'],
     synchronize: (process.env.DB_SYNCHRONIZE === 'true'),
   }),
   ItemModule,
 ],
 controllers: [AppController],
 providers: [AppService],
})
export class AppModule { }
Important
The TypeOrmModule’s synchronize property was enabled in the .env file and is useful in the development phase, as it performs the automatic synchronization of the database with the specifications of the application entities. But it should not be used in production, as it can cause data loss!
Extra
What about using the SERVER_PORT env on main.ts, instead of leaving it fixed on port 3000? Check out a tip in the ConfigModule documentation: https://docs.nestjs.com/techniques/configuration#using-in-the-maints
Defining the Item
Now, we can finally define our Item entity. Open the item/entities/item.entity.ts file and update the content to:
import { BaseEntity, Column, Entity, PrimaryGeneratedColumn, UpdateDateColumn } from "typeorm";

@Entity()
export class Item extends BaseEntity {
 @PrimaryGeneratedColumn('uuid')
 id: string;

 @UpdateDateColumn({ name: 'updated_at', type: 'timestamptz', default: () => 'CURRENT_TIMESTAMP' })
 updatedAt: Date;

 @Column({ name: 'name', type: 'varchar', length: 50 })
 name: string;

 @Column({ name: 'description', type: 'varchar', nullable: true, length: 255 })
 description?: string;

 @Column({ name: 'quantity', type: 'int' })
 quantity: number;
}
Note that the definitions of the mapping of the relational object of TypeORM are all made by annotations in the classes and attributes.
The default mapping for the string type is a varchar(255) column and for the number type it’s an integer (depending on the database). Check out more information in the documentation.
In the example of the description column that we declared, we could only use @Column({nullable: true}), but we fill it all in for more detail. For updatedAt, the decorator @UpdateDateColumn was used, which updates the value automatically, whenever an update is made to the registry. There are also @CreateDateColumn, @DeleteDateColumn and @VersionColumn. TypeORM calls them Special Columns.
Our entity is now ready for use. 🎉️
If we start the application now, the table will be created automatically in the database, with the structure defined above (due to the syncronize: true property defined in the AppModule).
But we have not yet updated item.service.ts to use TypeORM.
Before that, how about we create our DTOs?
Defining Data Transfer Objects (DTOs)
You may have noticed that our generated ItemController and ItemService didn’t receive the Item directly for the Create() and Update() calls, but the DTOs CreateItemDto and UpdateItemDto, which CRUD Generator created.
When using DTOs, we may not directly expose our internal model (of the database) to those who consume the API, but rather a representation of the data with the relevant (or allowed) attributes for external use. Having greater control over the data and the possibility of a better performance (consulting only the necessary table columns) are some of the advantages of using DTOs. So, let’s define them.
Open item/dto/create-item.dto.ts and replace the content with:
import { IsInt, IsNotEmpty, IsOptional, IsString, Min } from 'class-validator';

export class CreateItemDto {
 @IsString()
 @IsNotEmpty()
 name: string;

 @IsOptional()
 @IsString()
 description: string;

 @IsInt()
 @Min(0)
 quantity: number;
}
Got an error out there?
It was because we did not install the dependency class-validator, responsible for ensuring that the values received in our DTO are in accordance with what we expect. We also need a class-transformer for validation to be performed automatically. Install both with:
npm install --save class-validator class-transformer
You can check the full list of validators, as well as more details about them in the documentation.
The item/dto/update-item.dto.ts is already ready, requiring no changes:
import { PartialType } from '@nestjs/mapped-types';
import { CreateItemDto } from './create-item.dto';

export class UpdateItemDto extends PartialType(CreateItemDto) {}
Here extendsPartialType(CreateItemDto) does the job by taking the properties of CreateItemDto and reusing them automatically; however, it now turns all attributes as optionals.
We will update main.ts to perform automatic validation, adding the line:
app.useGlobalPipes(new ValidationPipe());
The file will look like this:
import { ValidationPipe } from '@nestjs/common';
import { NestFactory } from '@nestjs/core';
import { AppModule } from './app.module';

async function bootstrap() {
 const app = await NestFactory.create(AppModule);
 app.useGlobalPipes(new ValidationPipe());
 await app.listen(3000);
}
bootstrap();
You can see more details (and settings) of the validator in the documentation.
Implementing the ItemService
As we mentioned earlier, item/item.service.ts is called by the controller (ItemController) and is responsible for the business logic. The code generated by the CRUD Generator contains the basic methods we need, but they’re not implemented (they only return explanatory messages).
Using the Repository pattern, we create an abstraction for the way we obtain data for the entity: Whether it’s from the application’s standard or a secondary database, an external API via REST or any other way.
As in the case of Item we have a simple CRUD and we are using TypeORM, we’ll use the Repository that it provides us, leaving the file like this:
import { Injectable, NotFoundException } from '@nestjs/common';
import { InjectRepository } from '@nestjs/typeorm';
import { Repository } from 'typeorm';
import { CreateItemDto } from './dto/create-item.dto';
import { UpdateItemDto } from './dto/update-item.dto';
import { Item } from './entities/item.entity';

@Injectable()
export class ItemService {
 constructor(@InjectRepository(Item) private readonly repository: Repository<Item>) { }

 create(createItemDto: CreateItemDto): Promise<Item> {
   const item = this.repository.create(createItemDto);
   return this.repository.save(item);
 }

 findAll(): Promise<Item[]> {
   return this.repository.find();
 }

 findOne(id: string): Promise<Item> {
   return this.repository.findOne(id);
 }

 async update(id: string, updateItemDto: UpdateItemDto): Promise<Item> {
   const item = await this.repository.preload({
     id: id,
     ...updateItemDto,
   });
   if (!item) {
     throw new NotFoundException(`Item ${id} not found`);
   }
   return this.repository.save(item);
 }

 async remove(id: string) {
   const item = await this.findOne(id);
   return this.repository.remove(item);
 }
}
Since we’re using an external provider (TypeORM’s Repository), we need to declare its module as an import of item.module.ts, leaving the file like this:
import { Module } from '@nestjs/common';
import { TypeOrmModule } from '@nestjs/typeorm';
import { Item } from './entities/item.entity';
import { ItemController } from './item.controller';
import { ItemService } from './item.service';

@Module({
 imports: [TypeOrmModule.forFeature([Item])],
 controllers: [ItemController],
 providers: [ItemService]
})
export class ItemModule { }
Finally, item.controller.ts should now show errors in the last three methods (findOne(), update() and remove()) due to calls to itemService that now expect an id of type string (it was a number). Replace `+ id` with just `id` to remove the cast and …
Voilà!
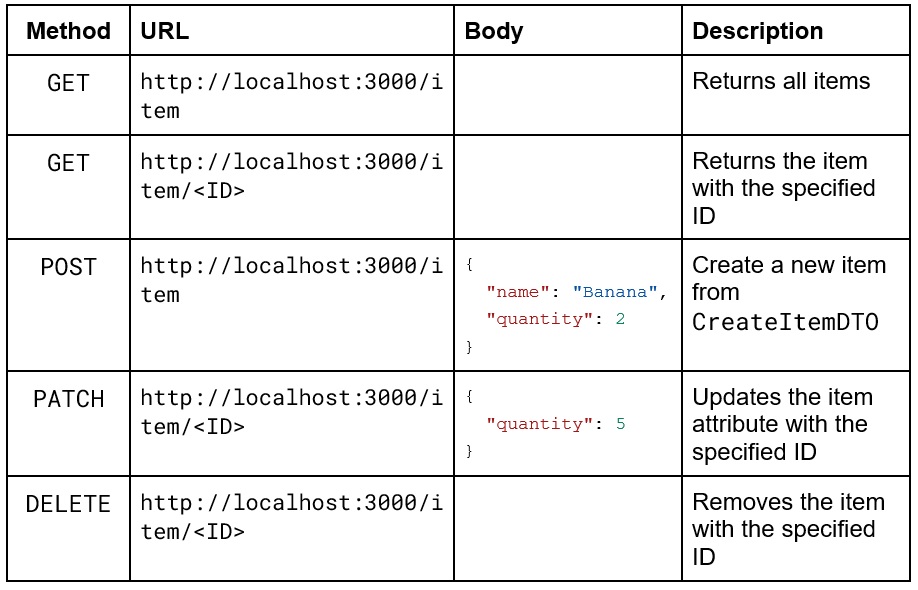
Now our API is implemented and it’s possible to perform operations of create, read, update and delete (CRUD) of items!👏🏼️
To perform all operations, you need to send REST requests via Postman, Insomnia, curl or as you prefer to the following addresses (according to item.controller.ts):
Documenting with OpenAPI (Swagger)
Before we finish, we’ll show you how simple it is to document the API according to OpenAPI (commonly used to describe REST APIs and make it easier to other developers who are integrating to our API), using the Swagger module.
With a few steps, Swagger will be working. Begin installing the dependencies:
npm install --save @nestjs/swagger swagger-ui-express
Then update main.ts to look like this:
import { ValidationPipe } from '@nestjs/common';
import { NestFactory } from '@nestjs/core';
import { DocumentBuilder, SwaggerModule } from '@nestjs/swagger';
import { AppModule } from './app.module';

async function bootstrap() {
 const app = await NestFactory.create(AppModule);
 app.useGlobalPipes(new ValidationPipe());

 const config = new DocumentBuilder()
   .setTitle('Shopping list API')
   .setDescription('My shopping list API description')
   .setVersion('1.0')
   .build();
 const document = SwaggerModule.createDocument(app, config);
 SwaggerModule.setup('api', app, document);

 await app.listen(3000);
}
bootstrap();
Now, we just need to update our entity and the DTOs with decorators for Swagger to identify them:
In the item/dto/create-item.dto.ts file, add imports and @ApiProperty() to the attributes. In the case of description, which is optional, use @ApiPropertyOptional(). It’s also possible to enter some options, such as example value and description. The file might look like this:
import { ApiProperty, ApiPropertyOptional } from '@nestjs/swagger';
import { IsInt, IsNotEmpty, IsOptional, IsString, Min } from 'class-validator';

export class CreateItemDto {
 @ApiProperty({ example: 'Bananas' })
 @IsString()
 @IsNotEmpty()
 name: string;

 @ApiPropertyOptional({ example: 'Cavendish bananas', description: 'Optional description of the item' })
 @IsOptional()
 @IsString()
 description: string;

 @ApiProperty({ example: 5, description: 'Needed quantity' })
 @IsInt()
 @Min(0)
 quantity: number;
}
There are additional decorators and options that you can also add to the controllers’ methods and describe the functions. Check out the sample code of NestJS.
And for item/dto/update-item.dto.ts, it’s simpler:
import { PartialType } from '@nestjs/swagger';
import { CreateItemDto } from './create-item.dto';

export class UpdateItemDto extends PartialType(CreateItemDto) {}
It’s basically the same, but changing the import {PartialType} from ‘@nestjs/mapped-types’ to ‘@nestjs/swagger’.
Running the application
The big moment has arrived! Now the application is ready and with some basic documentation. We can start and see everything working with:
npm run start:dev
When you open http://localhost:3000/api in the browser, Swagger’s page will be displayed with the detailed API, including the DTOs! You can even make test calls right there.
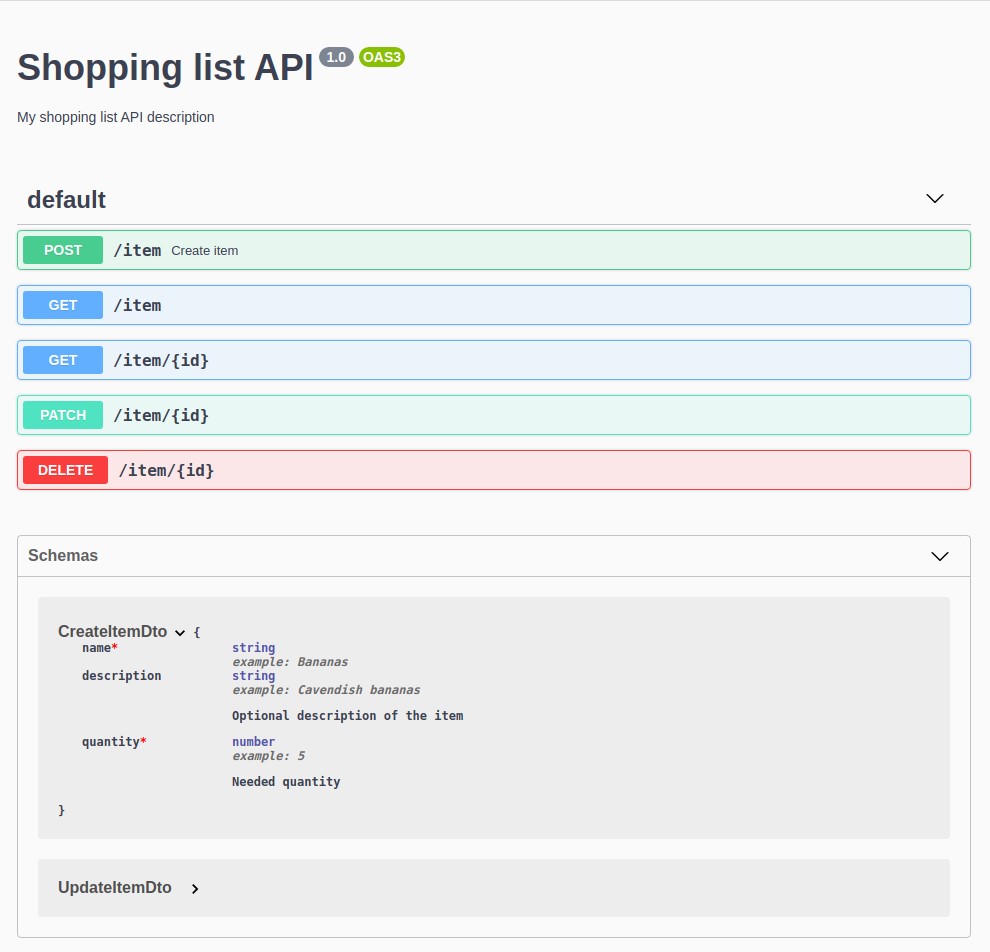
Check out this demo:
What about security?
Most of the time, we want our API to have user authentication in order to free access to available services. We do not cover these aspects in this guide, but the NestJS documentation has a specific section on the subject at https://docs.nestjs.com/security/authentication.
In addition to the authentication topic, we recommend the following readings and activations on your server:
- Helmet, which adds HTTP headers to make the service a bit more secure;
- CORS, to limit requests from browsers by domain;
- CSRF, makes use of csurf to prevent attacks of cross-site request forgery;
- Rate limiting, to reduce attempts of brute force attacks.
Important
These implementations don’t make your application attack-proof, but they do help protect against some common and/or basic vulnerabilities.
Conclusion
As we said earlier, as NestJS has a predefined architecture and several plugins ready to use, the development of an API (especially with the help of NestCLI) is easy, with an organized code, well-structured by default, following good practices and easily documented via Swagger.
In this guide, we presented only a starting point. Continue to practice improving the code (how about creating the Category entity to add to Items?), writing tests and adding authentication to the API.